Protein Marker Definition and Usage
Protein Marker is a mixture of proteins of known molecular weight, which is used as a "ruler" to indicate the size of protein bands.
In the process of Western Blot, the molecular weight marker is like a screw, although it is a small link, however, it is such a small detail that has a significant effect on the experimental results.The role of the marker is mainly used to indicate the molecular weight of the protein bands corresponding to the size of the molecular weight, and only if the standard amount of accurate and correct, the results of the experiments are convincing, in addition to protein Marker also shows whether the membrane is transfected or not. In addition, it also shows whether the membrane transfer is successful or not, and the degree of electrophoresis of the protein on the gel, etc. Therefore, choosing the right protein marker is also one of the necessary conditions for the success of Western Blot experiments.
Classification of Protein Markers
In general, the most commonly used protein markers are categorized into non-pre-stained protein markers and pre-stained protein markers.
It is a premix of several proteins of known molecular weight and purified, which is convenient for the comparison of proteins of different sizes. Non-pre-stained Marker is not as good as pre-stained Marker because it is completely invisible during electrophoresis, and can only be indicated after protein staining at the end of electrophoresis, and cannot be used as a reference in the experimental process, which belongs to the type of "hindsight". However, since the protein is not accompanied by a dye molecule or a marker molecule, the size shown is exactly the original size of the protein, so it is more accurate and can accurately determine the size of the protein.

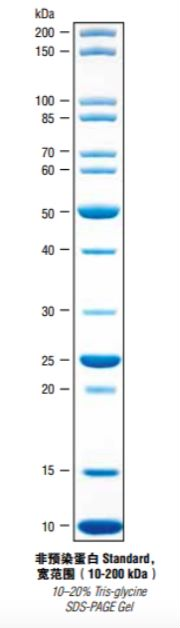
Pre-mixed Marker usually has a few bands doubling the concentration as an indication, because the more bands are mixed, the worse it is to remember, who knows which one is that one! It's hard to count until your eyes are blurred. So when you see the particularly concentrated ones the marker bands will remember where they are. Remember though, the smaller bands are usually not as easy to see. In terms of selection, of course, it is best to choose at least one of the bands that is similar in size to your target protein, the closer the better.
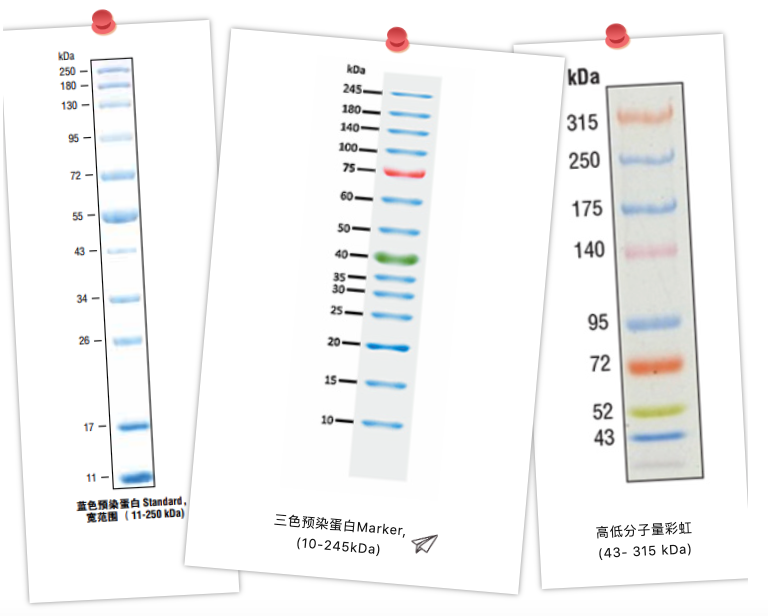
Pre-stained Protein Marker is some purified proteins mixed together by covalent coupling with a dye, which can be directly observed during electrophoresis or membrane transfer.
Pre-stained Protein Markers are convenient for our experiments. This protein molecular weight standard can help us monitor electrophoresis and estimate mobility during and after electrophoresis, as well as after membrane transfer - for example, if it is known that the optimal zone of resolution for vertical electrophoresis is about 2/3 of the way through the gel, using a pre-stained Marker it is possible to For example, it is known that the optimal resolution zone of vertical electrophoresis is about 2/3 of the gel, if you use a pre-stained Marker, you can predict when the target protein enters the optimal resolution zone and stop the electrophoresis in order to get the optimal resolution effect; you can also terminate the electrophoresis in time if you observe an abnormality in the electrophoresis of the Marker; in addition, you can observe whether the protein is transferred completely to the membrane after the transfer of membrane in the Western Blot and you can label the molecular weight of the protein on the membrane, which is why it attracts a lot of laboratories to buy the pre-stained protein standard.
It is worth noting that the pre-stained protein marker is covalently coupled with the dye, so the migration characteristics may change when electrophoresed under different buffer conditions, which may lead to some deviations, so it is not suitable for precise localization of proteins - however, in most cases, the bands on the marker may not be identical to the target protein, and the results we get are just the same as the target protein. However, in most cases, the Marker bands may not be exactly the same as our target protein, and what we get is just a reference size relative to the Marker indication, and in the end, we need Western to characterize it, so if we don't need to distinguish between bands of similar sizes, the pre-stained Marker is still very useful, and it can also be used in conjunction with the unstained protein standard.
Classification of Prestained Protein Marker
Pre-stained protein Marker is divided into: monochrome pre-stained and multi-color pre-stained, monochrome pre-stained protein Marker will usually use some of the bands to double the concentration of certain bands to deepen the thickness of certain bands to suggest the size of their size, so that we can quickly memorize and differentiate between the size of the individual bands. Color protein markers are distinguished by different colors, which is even more recognizable. Moreover, if a colorful rainbow Marker comes out in a dull electrophoresis experiment, the mood will be happier at this time!
In addition to the above, there are some other types of protein Markers on the market: fluorescent protein Markers, biotinylated Markers, developed protein Markers, etc....
In addition, protein Markers are categorized into high molecular weight, low molecular weight and wide molecular weight according to molecular weight range. High molecular weight range Markers are often used for large molecular weight proteins, while small molecular weight range Markers are often used for small proteins or even some peptides. if you consider the whole laboratory, choose broad molecular weight Markers with more uniform band distribution, so that your proteins can be easily judged no matter which interval they are in.
Some problems with Marker
For example, the instruction manual lists 7 bands, in fact, it is normal to run out 6 bands, it may be that the running time is not enough, if your protein is not very small, you can wait for the bromophenol blue front to run out of the gel before turning off the electrophoresis apparatus, so that you should be able to have 7 bands. Sometimes there will be 5 bands, but as long as the upper and lower two bands of your target protein can be run out, it does not have to be 7 bands.
First, the gel is not pressed
Secondly, the fluidity of the glue at the edge of the plate and the center of the glue may be different, there is no way to do this, with the viscosity and surface tension. If a variety of methods can not solve the above phenomenon, personal advice maker to change a channel on the sample, choose a lane near the center of the swim lane to run a run.
Edge effect, at the edge of the two lanes of the sample will be like this. You can try slower electrophoresis speed ......
Either the glue is not well pressed when it is prepared, the glue is not well prepared, or the electrophoresis voltage is too high, the electroosmotic force is strong, or the glass plate is not well clamped during electrophoresis, and the inner electrophoresis solution is leaking, please check them one by one.
Cause 1: The volume of sample is too much, the volume of sample should be reduced.
Countermeasure: The sample volume should be flexibly controlled according to the sample concentration and gel thickness. Generally, the sample volume is 10-15μL (i.e. 2-10μg of protein). If the sample is very dilute, the sample volume can reach 100μL.
Cause 2: Incomplete dissolution of the sample.
Countermeasures:
(1) The sample should be fully dissolved: keep all kinds of protein samples and Marker can be fully dissolved before sampling, it is better to centrifuge the sample before sampling, and remove the particles that can not be dissolved.
(2) Sample dissolution solution can be added according to the requirements of protein kits for molecular weight standards; if the standard and unknown samples are self-configured, follow 0.5-1.0mg/L sample dissolution solution. After dissolution, transfer it to Ep tube, put the cap on (you can add a clip at the cap) and then heat it in a water bath at 110 degrees Celsius for 3 minutes (you can drill several round holes with the same diameter as the Ep tube in the thin Styrofoam plate, and the Ep tube is put down until the edge of the cap is constrained from going down any further, and then put the thin Styrofoam plate, which is exposing most of the body of the Ep tube, in the boiling water bath, and the thin Styrofoam plate floats naturally in the boiling water bath. The thin Styrofoam sheet naturally floats on the surface of the boiling water, making it easier to access and heat, and avoiding splashing of the boiling water.
A batch of Ep tubes can be placed in the boiling water bath for different times. (Do not throw the Ep tubes into the boiling water bath, the lids may be washed off) and then cool at room temperature for use. If the sample is not used for a longer period of time, store the sample in a refrigerator at -20 degrees Celsius, and when needed, heat the sample in boiling water at 110 degrees Celsius for 3 minutes at room temperature and cool it before removing it for use and then applying the sample to remove the substable aggregates in the sample proteins.
(3) Change the sample buffer solution so that the sample can be fully dissolved and the amount of SDS should be sufficient.
Reason: SDS bands are electrophoretically linked to neighboring proteins. In addition to over-sampling and incomplete dissolution of the sample, leakage of the sample wells of the gel can cause the electrophoretic bands to widen. The leakage is often caused by cracks between the gel and the glass plate. Countermeasures: At this time, the gel can only be re-prepared, the comb should be careful when pulling up the gel cohesion is completed, the speed should not be too fast, the direction of pulling up should be perpendicular to the surface of the gel; to avoid cracks between the glass plate on both sides of the gel and the gel, don't squeeze the glass plate on both sides of the gel in the process of gel preparation.


